Chapter 2 - Heroes and Villains
IN THIS LEVEL
Navigation, Animation, Sound
We are going to use what you made in your side quest and expand on it. We will:
Use a NavigationRegion3D Node for our rooms
Add a Naviagation3D Node to our character
Add navigation code to our character
Add animations to our door for Opening, Closing, Locked, Unlocking, and Locking
Add sound effects to our door animations.
Add optional customizable Keys to doors
At the end your character will be able to make a beeline for the door, and you will be able to add doors (with or without keys) easily!
“Look at all the skills you’re learning! It’s great to have you back! Let’s get that door opening so we can break on through to the other side!”

Design the Feature First
We have been taking shortcuts in the first few lessons by jumping straight to the how of everything. We are going to take a step back now and talk about the process to get there. As we move farther into this class, you are going to be making a lot of decisions that are going to make your project diverge from the lessons we teach. You are going to be expected to make new and different choices. So, you must see how the sausage is made.
We are going to design a door. Let’s talk about the features of our door:
It must have a model that is capable of opening and closing (i.e. the door itself is separate from the doorframe.)
It needs animations for: opening, closing, trying to be opened when locked, locking, and unlocking.
It needs sounds for: opening, closing, being locked, locking, unlocking.
It must trigger all of its animations on its own with no input from the outside world (encapsulation) when someone nears the door. (Specifically, we are saying that there is no use action for doors. They’re all automatic.)
It must be capable of opening for different character types (mobiles): players, NPCs, Enemies. And each door should be customizable to only allow certain types through.
It must be capable of being locked and unlocked with a key. Plus, it must be able to detect whether or not anyone trying to open it has a key.
That’s a long list of features. Number one we have handled by importing Kay Lousberg’s door model. We need to add animations and sounds for the door (2 & 3). We’ve already set up and used an Area3D for collision detection (4), but we need to have a script that uses it to trigger animations. We’ve also already set layer masks for who can trigger a door (5). (More on that in a second.) We need to decide how keys will work, and script the key part of the door (6).
Now that we know what we want to build, it’s time to write tests.
“Software Architecture is an important part of making games. A well-architected game system is modular, and therefore re-usable. We can be meta about our laziness, and translate the things we’ve created from game to game if we are smart.”

Read More: An Introduction to UML
Read More: UML History and Overview
Read More: Is High Quality Software Worth the Cost? (A discussion of software architecture.)
Read More: Godot’s Architecture Diagram
Read More: Godot’s Design Philosophy
Read More: What Is Software Architecture? (A Godot Example)

“Design and Architecture are an important part of any software project. So much so, that there’s a whole language for it called the Unified Modeling Language (UML). These days, UML is primarily used by software architects, but it’s one of those things that you should learn if you want to be more than a code monkey, just writing software that other people design.”
Write Tests Second
Let’s talk about what we need to test our door:
We need a way for a character to walk to the door and check to make sure it opens.
When the door is locked, and the player has a key, we need to play the unlock and open animation.
When the door is locked, and the player doesn’t have a key, we need to check that the door plays the locked animation.
We need a way to check that the door closes after the player walks away.
When the door is locked, and and the player has the key, and the door is open, when the player walks away, we need to play the lock and close animation.
So that’s five things we need to test. We are going to use a Cucumber approach to write our tests. This technique is called Behavior-Driven Development (BDD), and is a particular TDD approach. Gherkin, the language for Cucumber, is a simple language for designing tests that only has 3 main keywords we need to know. They are Given, When, and Then. Given states the test setup. When lists the steps we perform to do the test. Then tells what the expected result is at the end of the test so we know it is working. Let’s take our first test and write it in Gherkin:
Given we have a door
When a character approaches the door
Then the door open animation should play
That’s it! We are going to add that as comments to our test file and stub out the first test.
Create the folder structure environment -> door_tests in the
testfolder.Create a new script named “
door_tests.gd” in thedoor_testsfolder. (FileSystem -> test -> environment -> door_tests)Copy the code to the right into the script.
We now have our first test.
Now that we have the first test, let’s make a few more. We also want to test unlocking the door. Create a second test called test_unlock_door(), and stub it out with the following steps:
Given we have a door with a key
And a character holding the key
When the character approaches the door
Then the door open animation should play
We’ve added a new keyword: And. This just allows us to extend out Given and When steps with more starting conditions or more complicated test execution. While you can use And with tests, ideally each test would only test one thing. Otherwise when a test fails, you do not know why. We indent And with two spaces to logically group our three sections visually.
Our third test is similar to the second. Go ahead and create test_locked_door() and stub it out:
Given we have a door with a key
But a character without the key
When the character approaches the door
Then the door locked animation should play
Now we’ve got another helper keyword: But. This keyword is a signal to a negative condition. In this case, that we do not have the key needed.
We’ve got two tests left. Call our fourth test test_close_door():
Given we have a door
And a character has opened the door
When the character leaves the door
Then the door close animation should play
The new thing here, is that as part of the precondition, or setup, we’ve had a character open the door. We specified this because the door needs to be open to test closing it. We could have just run test one first, but that would mean our test isn’t atomic. Remember, we cannot guarantee that our tests will run in any certain order. But also, if tests 1 and 4 fail, we know it’s door opening that’s the problem. If only test 4 fails, we know that door closing is the problem.
Let’s call our last test test_lock_door():
Given we have a door with a key
And a character holding the key
And that character has opened the door
When the character leaves the door
Then the door lock and close animation should play
We now have our five tests stubbed out. Next we are going to talk about layers and masks, because it is important to understand them before we start coding our door triggers. Then, in the following sections we will take each test, write it, then write the code and animations to make our tests pass.
“There is a whole programming framework for Cucumber that you can use to run your tests. While it is supported for other languages, there is no Godot support. However what’s important is the way the keywords Given, When, and Then help clarify and compartmentalize our testing into Setup, Execution, and Assertion.
Cucumber is an example of an open source project that was started by one person, and now has become a tool used by many in the development world. It has since been bought by the company SmartBear, which offers technical support for Cucumber, which is still open source.”
Read More: 12 Benefits of BDD
Read More: Cucumber Gherkin Reference
“As a game developer, can you think of other than a normal key you could use this code for? You could create a magic gem that the player needs to find before they can open a door. They could be required to talk to a barkeeper before they can enter a back room, and you could put an invisible quest item “key” on the player after that conversation so that the door is suddenly open. What other uses for this door locking mechanism can you think to use for your game?”
Layers and Masks
There are 7 different layer types defined in the Godot editor. Three of them are for 2D, and so don’t concern us much in a 3D game. (We will still use 2D for UI, these layers just aren’t necessary for what we will be doing.) 3D render was implemented for First-Person Shooters (FPS) with high amounts of detail. We won’t need that. 3D Navigation and Avoidance are going to be handled for us automatically by the 3DNavigationServer. (More on that soon.)
We are left with the 3D Physics Layer. In Level 1, we set the collision layer for Walls to 2. Why did we pick 2? It was completely arbitrary.
Go to Project -> Project Settings…
Scroll down to the bottom of the General tab and find the Layer Names section. (Project -> Project Settings… -> General -> Layer Names)
Click on 3D Physics.
Here is where you can decide which layers you want to use for which masks. In Level 1, we described layers as transmitters, and masks as receivers. A layer is where an object sits, and a mask is what an object looks at, or cares about. We are going to name the first 7 layers, talk about how we plan to use them, and then talk about how they work.
Set Layer 1 to “Floor”.
This is the default layer set by Godot. We are using it for our floor layer so that if we forget to change layers on an item, it won’t fall through the floor. (Laziness at work!)Set Layer 2 to “Wall”.
We are separating our walls from our floors just in case we want to do something later, like have ghosts float through walls.Set Layer 3 to “Destructible”.
Destructibles are objects like barrels, boxes, pots, or even grass that we want to mark as destroyable by the player.Set Layer 4 to “Loot”.
Loot are things we want the player to be able to pick up. This layer is for us to detect objects that are loot, for example if we wanted a magnet power to draw coins into the player.Set Layer 5 to “Player”.
This layer is where our player stands.Set Layer 6 to “NPC”.
We put NPCs on their own layer because we may have different interactions for them than we do with enemies. Or we may want to deal with things like players getting stuck behind NPCs by detecting collisions and allowing a passthrough after two or more collisions.Set Layer 7 to “Enemy”.
Enemies are on their own layer as well to handle collisions. This isn’t so they can damage our player, but so they cannot walk through each other in combat.
Our knight player character has its collision layer set to 5. If we want to detect collisions with it, that’s the layer we look on. We want the player to collide with everything, so it cannot walk through (or fall through) any of them.
It’s important to note that loot doesn’t get picked up because of this collision. In fact, the loot is going to look on the player layer (5) to see if it is picked up. The loot layer is so that something like a magic spell (say a telekinesis spell that pulls loot to the player) can detect the loot lying on the ground. If we don’t have a pickup method on a loot, say a piece of armor - a player would be able to stand on it or push it around. Useful if you want something the player has to push around before collecting it.
Now that we have an understanding of layers and masks, let’s do some testing.
Read More: What is Bitmasking
Read More: Bitmasks in Gaming (Unity)
“The terminology of layers and masks comes from the implementation of these features. If you look at the layers, you will see there are exactly 32 layers. The reason for this is collision detection is handled by the video card. Video cards have 32-bit processors - hundreds or even thousands of them. So there’s a GPU processor handling each collision detection. To make these extremely fast, they use what is known as a bit mask.
A collision layer is 32 ones and zeroes. A collision mask is another 32 ones and zeroes. So our walls have only their second bit set to 1, and all the thirty-one other bits set to zero. Our player has a mask that has bits one through seven set to 1.
When a GPU core checks for a collision between the player and a wall, it applies the player collision mask to the wall collision layer. If any of the positions both have a 1 at the same position, they collide. All the other bits are ignored.
This is called an AND mask, and it is a VERY fast operation. To put it into perspective, an average video card can do 64 of these bitwise comparisons per clock cycle. An average video card in 2024 has 2,000 cores, and a 2 Ghz clock cycle, which means it has 2 billion clock cycles per second per core. Which means in 1 second it can perform 128 billion collision detections for just one core.
A top-of the line video card in 2024 has upwards of 16,000 cores, can do 128 bitwise calculations a cycle, and has a speed nearing 4 Ghz, which means they can do 512 billion collision detections per second per core.”
Test 1: test_open_door()
We need to set up our test. Our first line says we need a door, but we also need a character to walk over to that door. We also need access to our door’s AnimationPlayer so we can test it. We will actually need those variables for all five tests. We can copy a lot of our work from the character_test.gd file. So let’s start there.
Copy the variable declarations, Before step and After step from
character_test.gdtodoor_test.gd.Add this line to the variable declarations in
door_test.gd:var animation_player: AnimationPlayerAdd this line to the Before step:
animation_player = door.get_node("AnimationPlayer")
That’s all the setup we need for our Given step. It could have been a little more verbose when we wrote it, but we got what we needed. When you are working for a business owner, or a game producer, they are only going to give you wheat they see. To them, it’s obvious you need a character if the character is walking. As a developer, it’s your job to fill in the technical blanks to get the test working.
Note that when we assigned the animation_player variable, we didn’t use the gDUnit4 invoke function on the runner. Instead, we used get_node on the door object. There are two animation players in the scene (the other is on our Knight), and we want the one attached to the door.
The next step requires us to have a character walk to the door. We don’t have code for this, but we are going to write what we think it would look like. We already have a rotate_to() function for our character that takes an object as an argument. We tested it last level. So let’s write something like that:
Add this line after the When step:
character.move_to(door)
Finally, we need an assertion. We already saw how to do this with the animation tree. It’s basically the same with the animation player.
Add this line after the Then step (all one line):
await assert_func(animation_player, "get_current_animation").wait_until(timeout).is_equal("open")
Let’s run our test!
Right-click
test_open_door()(indoor_test.gd).Select Run Tests.
The test fails of course, but it’s important where it fails. It should fail on or around line 32 with an error message like this:
Error: 'Invalid call. Nonexistent function 'move_to' in base 'CharacterBody3D (character.gd)'.'
Now all we have to do is implement the move_to() function.
“It may seem weird, and even a waste of time to write tests first, especially for something so simple. These simple tests will pave the way for much more complex logic later on. They will also undergird our later tests to help us debug complex failures more easily. A computer game is a fantastically complicated program.”
Designing the move_to() Function
We already have a good idea of what our move_to() function should look like. It should be very similar to our rotate_to() function. Walking to a Vector2 isn’t really possible. In our rotate function, we kept our Y Vector at a fixed point so that the model would not tilt weirdly forwards or backwards. But is our character wants to go up or down in our 3D world, we need coordinates in three dimensions.
Likewise, walking to where our SpringArm3D is pointing isn’t really helpful, because it’s pointing at a lot. We could use a point-and-click travel method, and we will implement that later, but that will be using a Vector3. So, our walk_to() function should be able to walk to a Node3D or a Vector3.
It turns out there’s a way in Godot to do this. There is a node called NavigationRegion3D that creates a navigation mesh for us. Then we couple that with a NavigationAgent3D and our character can traverse anywhere within that region.
So let’s write some gherkin:
Given that we have a <goal>
When a character walks to the <goal>
Then the character should reach the <goal>
Examples:
| Node3D |
| Vector3 |
This gherkin test is a little different. In gherkin it’s called a Scenario Outline. It should look familiar though, it’s a way of writing a parameterized test. We already did that with the rotate_to() function, so we can take our lead from that.
Open character_test.gd (test -> mobiles -> character_tests)
Add a test_move_to() function to the end of the file.
Copy the arguments from the previous function and use them in your new function.
Remove the Vector2 line.
Copy and paste the gherkin steps into the body of the function.
Add this line after the Given step:
var navigation_agent_3d = character.get_node("NavigationAgent3D")Add this line after the When step:
character.move_to(target)Add this line after the Then step (as one line):
await assert_func(navigation_agent_3d, "is_navigation_finished").wait_until(timeout).is_true()
In the next section we will implement the move_to() function - after we add a NavigationRegion3D to our test room.
“You may notice in Godot documentation, tutorials, and even this class, the use of the words “function” and “method” interchangeably. While technically Godot has functions, hence the “func” keyword, the GDScript syntax evolved from Python, which has both. The term function originates from C++, and method is from Java. The words mean the same thing in their respective languages. In Python, the words have distinction, but in Godot they do not.”
Coding the move_to() Function
Let’s setup a NavigationRegion3D for our test room.
Open the Test Room scene. (FileSystem -> test)
Select the Knight node.
Move the Knight outside of the room. (Click and drag the green square.)
Right-click on the TestRoom node.
Select Change Type…
Select NavigationRegion3D.
Click the Change button. (Two new buttons will appear in the toolbar: Bake NavigationMesh and Clear NavigationMesh.)
Click the Bake NavigationMesh button.
Select the Knight node.
Reset the Knight’s position. (Inspector -> Node3D -> Transform -> Position, then click the Reset button that look like a curved arrow.)
You should now have a room with a light blue navigation mesh covering the floor, like the picture to the right. (If you do not move the Knight, then the navigation mesh considers him part of the room.) We are now ready to code our move_to() function.

Open character.gd (mobiles -> characters)
Add a new @onready variable to the top of the file:
@onready var navigation_agent_3d: NavigationAgent3D = $NavigationAgent3DAdd a new move_to() function at the bottom of the file.
Add an argument called target with a type of Variant.
Add a return type of void.
Ensure your first line looks like:
func move_to(target: Variant) -> void:Add the following three lines to the body of the function (the first and third lines should be indented one level, and the third on 2 levels):
if target is not Vector3:target = target.global_positionnavigation_agent_3d.set_target_position(target)Add these lines in the _physics_process() function (between the
# Determine Movementcomment and theif is_player: get_input()line):
if !navigation_agent_3d.is_navigation_finished():var destination = navigation_agent_3d.get_next_path_position()var local_destination = destination - global_positiondirection = local_destination.normalized()rotate_to(destination, delta)
Let’s test it!
Open character_test.gd (test -> mobiles -> character_tests)
Right click on the test_move_to() function.
Select Run Tests. (At the bottom of the context menu.)
You should see the tests run and watch our knight run towards the door twice. Next we are ready to create our door opening animation!
If you get any failures, check the code at the end of this lesson and compare it to yours.
Animating a Door Opening
Our door opening consists of two parts. The first is creating the animation. The second is creating code to trigger the animation. Let’s start by building the animation. First, we need some sounds. This is where you have to decide whether or not you want to start spending money on game assets. Download one of the following sound effect asset packs depending on your budget:
Tom Music: Free Fantasy 200 SFX Pack FREE
Tom Music: Full Fantasy 250 SFX Pack $5
Ovani Sound: Medieval Sound FX Pack Vol. 3 $20
Magic Sound Effects: Medieval Fantasy Game Sound Effects $25
If you downloaded a Tom Music Pack:
Create the following folder structure in your Projects -> Assets folder:
Sound -> Sound Effects -> TomMusicCopy the zipfile into this folder.
Navigate to the Doors Gates and Chest WAV folder. (Fantasy SFX Pack By TomMusic -> WAV Files -> SFX -> Doors Gates and Chests)
Copy these files into assets -> sound -> sfx -> door_tommusic (you will have to make the folders in your project):
Door Close 2
Door Open 2
Lock Unlock
If you downloaded the Magic SFX Sound Pack:
Create the following folder structure in your Projects -> Assets folder:
Sound -> Sound Effects -> Magic Sound EffectsCopy the zipfile into this folder.
Navigate to the Environment WAV folder. (Medieval Fantasy Game Sound Effects -> SFXs -> wav -> Environment)
Copy and rename these files into assets -> sound -> sfx -> door_magic_sfx (you will have to make the folders in your project):
door_wood_close_01.wav
door_wood_open_01.wav
lock_01.wav -> Rename: unlock.wav
lock_03.wav -> Rename: locked.wav
lock_04.wav -> Rename: lock.wav
If you downloaded the Ovani Sound Pack:
Create the following folder structure in your Projects -> Assets folder:
Sound -> Sound Effects -> OvaniCopy the zipfile into this folder.
Navigate to the Dungeon folder. (Medieval 3 -> Dungeon)
Copy and rename these files into assets -> sound -> sfx -> door_ovani (you will have to make the folders in your project):
Dungeon Door Close Wet A.wav
Dungeon Door Open Wet A.wav
Dungeon Door Lock B.wav -> Rename: lock.wav
Dungeon Door Lock C.wav -> Rename: unlock.wav
Dungeon Door Lock D.wav -> Rename: locked.wav
Now that we have sounds, we are ready to create our open animation.
Open the door scene. (res://environment/doors/door.tscn)
Select the AnimationPlayer node. (The Animation panel will load in the bottom dock. If it is not selected, select it.)
Click the Animation Tools menu button. (In the Animation Panel toolbar, labeled Animation.)
Select New…
Type “open” for the animation name.
Click the OK button.
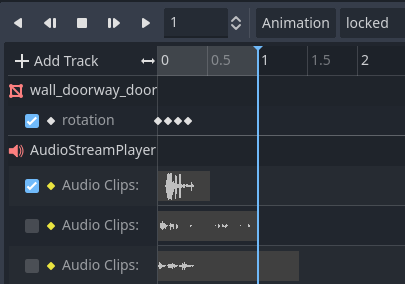
Click on the Door in the 3D View. (The wall_doorway_door MeshInstance3D node should now be selected and showing in the Inspector.)
Open the Transform section in the Inspector. (Inspector -> Node3D -> Transform)
Click the Tiny Key to the right of the Rotation section.
Ensure Create RESET Track(s) is selected in the dialog box that appears. (This is really important.)
Click the Create button. (A new rotation track will now appear in the Animation Panel.) (See the picture to the right.)
Click the Animation position text box. (It’s directly to the right of the playback buttons and has a zero in it.)
Type “0.5”.
Press the Enter key. (The blue timeline line will move to the half-second mark. You can also click and drag the blue line to move it.
Select the door again.
Update the Y Rotation to -120.
Press the Enter key. (The door will now appear open.)
Right-click on the blue timeline marker on the rotation timeline.
Select Insert Key…
Click on the white keyframe indicator that just appeared.
Ensure the Time = 0.5 and the Y rotation = -120 degrees. (In the Inspector.)
Press Shift + D. (The animation will play from the start, and you should see the door open.)
Congratulations! You’ve made your first animation! By setting two keyframes, the animation player extrapolates how to get from the first to the second frame and creates an animation for you! If you want your doors to open faster or slower, change where your second keyframe is on the timeline. If you want to change how open the door is, you can reduce the angle. If you want to change which way the door opens, you can make the angle positive instead of negative. You could even make two open animations, one for each direction.
When you create your first animation, the editor asks if you want to make a RESET track. With imported animation, like our Knight, a RESET track has no effect. But when you create your animations, a RESET track tells the editor what to set everything back to when you save your scene. Let’s say we hit save after opening the door. With a RESET track, the editor knows to close the door before saving. Without it, every room you’ve used the door in now has an open door.
We’ve got an animation, but what really makes this feel like a professional game is some sound. So let’s add our door opening sound!
Click the + Add Track button. (In the Animation panel.)
Select Audio Playback Track…
Select the AudioStreamPlayer3D node in the popup window.
Click the OK button.
If you downloaded a Tom Music Pack:
Open your door sounds folder. (assets -> sound -> sfx -> door_tommusic)
Drag and drop the open door sound into the audio clips timeline.
Select the clip.
Set the Time to 0.
Set the End Offset to 0.8.
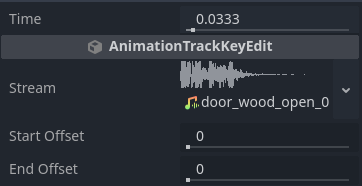
If you downloaded the Magic Sound Effects Pack:
Open your door sounds folder. (assets -> sound -> sfx -> door_magic_sfx)
Drag and drop the open door sound into the audio clips timeline.
Select the clip.
Set the Time to 0.0333. (You can also do this by dragging the audio file to the right just slightly with the help of the blue timeline line.)
If you downloaded the Ovani Sound Pack:
Open your door sounds folder. (assets -> sound -> sfx -> door_ovani)
Drag and drop the open door sound into the audio clips timeline.
Select the clip.
Set the Time to 0.
After you have the sound set, you can hit the play button and see that your first animation is complete! Next, we will code the trigger for it.
We built this door in the previous level. If you skipped that level, go back and find the section on creating the door.
It is common to use a lot of different sound files from different sources. Appending the creator's name is helpful later when you're trying to remember where you got something. It also helps when you want to give credit in your Readme file for the sounds you use. Keep in mind that these people are trying to make money off of what they create, so if you can, pay. If you can't, you can advertise for them. (You can also go back and pay more when your game hits it big!)
You'll notice we are using WAV files for our sound effects. Later, We will prefer Ogg Vorbis files for our music (some only comes in WAV format). While Godot supports MP3s as well, we will avoid using those. We use WAV files for sound effects because they are uncompressed, so they load immediately - necessary for small, quick sound effects.
Both Ogg Vorbis and MP3 files are highly compressed, which can cause lag issues with our sound effects. For music, they're great though because they are much smaller. We prefer Ogg Vorbis files for video game music, because there is no dead air at the beginning or end of them, which makes playing video game music seamless, especially when switching between tracks. MP3 files are meant to give you time between songs, and we don't want that. So, if we have a choice, we don't use MP3s. (While it used to be true that MP3s had better compression, that is no longer true.)
Sound effects will sometimes come in wet and dry versions. Wet sound effects have reverb or echoes added to them so they sound like they are in an environment. For example that echo when a door shuts. Dry versions do not have those added effects, allowing you to add them in with Godot. For now, we are going to stick with wet effects.


Tom Music Settings

Magic Sound Effects Settings
Magic Sound Effects Settings
Ovani Settings
Tom Music Settings
Ovani Settings
Writing the Open Door Code
Let’s get coding!
Add a script called “door.gd” to your door root node. (Either select the node and click the Add script button above it, or right-click on it and select Attach Script…)
Delete everything but the header. (“extends Node3D” is the header.)
Add these lines two lines down from the header:
@export var key_name: String
@export var open: bool = falseSelect the MobileDetector node.
Open the Node Signals tab. (Titled “Node”. Right-hand side dock, to the right of Inspector and to the left of History and Commit.)
Double-click the body_entered(body: Node3D) signal. (Area3D section, 5th one down. Sometimes you have to double-click it again if it wasn’t initially selected.)
Click the Connect button. (You will see a new function appear with a green arrow to the left in the margin. This indicates a signal connection.)
Add the following code to the _on_mobile_detector_body_entered function, replacing the “pass” (pay attention to the indentation):
if open == false:
if key_name == "":
$AnimationPlayer.play("open")
open = trueRun test_open_door() again. (In door_test.gd, right-click it and Run Tests…)
We now have a door that opens when a character approaches it, and a test that proves it! Now it’s time to implement unlocking a door.
If you get any failures, check the code at the end of this lesson and compare it to yours. Also make sure you connected the body_entered() signal and not the area_entered() signal.
Read More: Godot Indentation
Read More: Python Indentation
“Indentation is very important in GDScript. It gets this from the python. language. Interpreters and compilers (the programs that turn our programming language into 1’s and 0’ the computer can read, i.e. binary) require a way to know how code is grouped. In some languages that is done by using semicolons at the end of lines and curly braces to enclose functions. In Godot, like python, the compiler uses indentation. So when you hit the Tab key, you are telling the compiler, “this next section is part of the previous one”. As if you had surrounded them with curly braces.”
Designing and Coding Unlocking the Door
We want any door to be lockable. We also want it possible for any Moblie (player, NPC, or enemy) carrying a key to be able to unlock and move through the door. So first we need to setup our test_unlock_door() test.
Add this line after the Given step:
door.key_name = "Key"Add these line after the And step:
key = Node.new()
key.name = "Key"
character.add_child(key)Add this line after the When step:
character.move_to(door)Add this line after the Then step (on a single line):
await assert_func(animation_player, "get_current_animation").wait_until(timeout).is_equal("unlock")
We then need to declare a key node variable, and we need to ensure it gets cleaned up after any test it’s used in.
Add this line to the variable declarations in
door_test.gd:var key: NodeAdd these lines to the After Test step (pay attention to the indentation):
door.key_name = ""
if is_instance_valid(key):
key.queue_free()
As usual, you can run the test, and see that it fails. Let’s add the animation first. We want the unlock sound to play, then the door to open.
Go back to the door’s AnimationPlayer.
Add a new animation called “unlock”.
Set the rotation at 0.3 seconds to x = 0, y = 0, z = 0. (wall_doorway_door -> Inspector -> Node3D -> Transform -> Rotation -> Key button) (No need to create a second RESET track.)
Set the rotation at 0.8 seconds to x = 0, y = -120, z = 0.
Add an AudioStreamPlayer3D track.
If you downloaded a Tom Music Pack:
Drag and drop the unlock sound into the audio clips timeline.
Set the Time to 0.
Set the End Offset to 0.7.
Drag and drop the open door sound into the audio clips timeline.
Set the Time to 0.3.
If you downloaded the Magic Sound Effects Sound Pack:
Drag and drop the unlock sound into the audio clips timeline.
Set the Time to 0.
Set the End Offset to 0.1.
Drag and drop the open door sound into the audio clips timeline.
Set the Time to 0.3.
If you downloaded the Ovani Sound Pack:
Drag and drop the unlock sound into the audio clips timeline.
Set the Time to 0.
Set the Start Offset to 0.05.
Set the End Offset to 0.9.
Drag and drop the open door sound into the audio clips timeline.
Set the Time to 0.4.
Finally, let’s add code in door.gd to make it work:
Add the following code to the _on_mobile_detector_body_entered function (the else should be at the same indentation level as the second if statement):
else:
if body.has_node(key_name):
$AnimationPlayer.play("unlock")
open = true
Now we are ready to run the test_unlock_door() test. It should now pass. Next up, encountering a locked door!
If you get any failures, check the code at the end of this lesson and compare it to yours.

Tom Music Settings


Magic Sound Effects Settings
Ovani Settings
Designing and Coding a Locked Door
If the door has a key, and the player doesn’t have that key, we want it to be locked. As always, testing first. So let’s setup our test_locked_door() test.
Add this line after the Given step:
door.key_name = "Key"Add this line after the When step:
character.move_to(door)Add this line after the Then step (on a single line):
await assert_func(animation_player, "get_current_animation").wait_until(timeout).is_equal("locked")
As you can see, this is just a stripped down version of our previous test, with a different animation. Let’s make that animation! We want the locked sound to play, and the door to rattle, as if our character tried to open it and failed.
Add a new animation called “locked”.
Set the rotation at 0 seconds to x = 0, y = 0, z = 0. (wall_doorway_door -> Inspector -> Node3D -> Transform -> Rotation -> Key button) (No need to create a second RESET track.)
Set the rotation at 0.1 seconds to x = 0, y = -2.6, z = 0.
Set the rotation at 0.2 seconds to x = 0, y = 2.4, z = 0.
Set the rotation at 0.3 seconds to x = 0, y = 0, z = 0.
Add an AudioStreamPlayer3D track.
If you downloaded a Tom Music Pack:
Drag and drop the unlock sound into the audio clips timeline.
Set the Time to 0. (Without being cutoff, it will sound different)
If you downloaded the Magic Sound Effects or Ovani Sound Packs:
Drag and drop the locked sound into the audio clips timeline.
Set the Time to 0.
Now let’s add code in door.gd to make it work:
Add the following code to the _on_mobile_detector_body_entered function (this else should be at the same indentation level as the third if statement (i.e. the player doesn’t have the key)):
else:$AnimationPlayer.play("locked")
Now we are ready to run the test_locked_door() test. It should now pass. Now let’s make sure our mobiles close the door when they leave!
If you get any failures, check the code at the end of this lesson and compare it to yours.
Tom Music Settings
Ovani Settings
Magic Sound Effects Settings
Designing and Coding Closing the Door
When someone passes through a door and leaves the trigger area, we want the door to automatically close like they closed it behind them. (Our mobiles are all very polite.) This will mean that later doors that aren’t supposed to let certain people in (players, NPCs, enemies), they won’t be able to follow through (most of the time). Let’s setup our test_close_door() test.
Add these two line after the And step:
character.move_to(door)
await assert_func(animation_player, "get_current_animation").wait_until(timeout).is_equal("open")Add this line after the When step:
character.move_to(Vector3(0,0,0))Add this line after the Then step (on a single line):
await assert_func(animation_player, "get_current_animation").wait_until(timeout).is_equal("close")
You’ll notice we broke our rule of only one assertion per test. We did this because we have to know when the character has reached the door before we walk back to the origin. So while we are waiting for the character to reach the door, we have a separate test to tell us if this alone fails. Obviously if opening the door fails, closing the door is also going to fail, so this is ok.
Let’s add the close animation. We want the the door to shut and the close sound to play at the right time so it matches the animation.
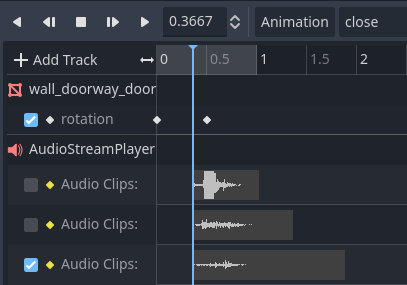
Add a new animation called “close”.
Set the rotation at 0 seconds to x = 0, y = -120, z = 0. (We want the door to start open.)
Set the rotation at 0.5 seconds to x = 0, y = 0, z = 0. (Closed)
Add an AudioStreamPlayer3D track.
Drag and drop the door close sound into the audio clips timeline. (For whichever sound file you have.)
Set the Time to 0.3667. (It might be easier to drag the file to the correct spot using the timeline indicator as a guide.)
Set the Start Offset to 0.1. (For the Ovani soundfile only.)
Once again, we finish up with code in door.gd, but first we need a new function.
Select the MobileDetector node.
Open the Node Signals tab. (Titled “Node”. Right-hand side dock, to the right of Inspector and to the left of History and Commit.)
Double-click the body_exited(body: Node3D) signal. (Area3D section, 5th one down. Sometimes you have to double-click it again if it wasn’t initially selected.)
Click the Connect button. (You will see a new function appear with a green arrow to the left in the margin. This indicates a signal connection.)
Add the following code to the _on_mobile_detector_body_exited function, replacing the “pass” (pay attention to the indentation):
if open == true:
if key_name == "":
$AnimationPlayer.play("close")
open = false
Now we are ready to run the close door test, and create our last animation!
If you get any failures, check the code at the end of this lesson and compare it to yours. Also make sure you connected the body_exited() signal and not the area_exited() signal.
Tom Music Settings
Ovani Settings
Magic Sound Effects Settings
Designing and Coding Locking the Door
If the door has a key, and the mobile passing through has just unlocked it, we are going to assume they will courteously lock it behind themselves. Our test_lock_door() test (not to be confused with the previous test_locked_door() test) is as follows:
Add this line after the Given step:
door.key_name = "RubyGem"Add these lines after the And step:
key = Node.new()
key.name = "RubyGem"
character.add_child(key)Add these two line after the 2nd And step:
character.move_to(door)
await assert_func(animation_player, "get_current_animation").wait_until(timeout).is_equal("unlock")
Add this line after the When step:
character.move_to(Vector3(0,0,0))Add this line after the Then step (on a single line):
await assert_func(animation_player, "get_current_animation").wait_until(timeout).is_equal("close_and_lock")
This is our most complex test yet, and will be our most complex animation as well. Note the name of the key. We did this just so you realize the name of the key node does not have to be “Key”. It can literally be anything that you can use as a node name.
For the animation, we want the door to shut with our close sound. Then we want the locking sound to play and the door to wiggle a little showing that it’s locked.
Add a new animation called “close_and_lock”.
Set the rotation at 0 seconds to x = 0, y = -120, z = 0. (We want the door to start open.)
Set the rotation at 0.5 seconds to x = 0, y = 0, z = 0. (Closed)
Set the rotation at 0.9 seconds to x = 0, y = -2.4, z = 0.
Set the rotation at 1.0 seconds to x = 0, y = 2.6, z = 0.
Set the rotation at 1.1 seconds to x = 0, y = 0, z = 0.
Add an AudioStreamPlayer3D track.
Drag and drop the door close sound into the audio clips timeline. (For whichever sound file you have.)
Set the Time to 0.3667. (It might be easier to drag the file to the correct spot using the timeline indicator as a guide.)
Set the Start Offset to 0.1. (For the Ovani soundfile only.)
Add a 2nd AudioStreamPlayer3D track.
Drag and drop the lock sound into the audio clips timeline. (Use the unlock sound if you downloaded the Tom Music Pack.)
Set the Time to 0.8333. (It might be easier to drag the file to the correct spot using the timeline indicator as a guide.)
Now let’s add our last bit of code into door.gd:
Add the following code to the _on_mobile_detector_body_entered function (as always pay attention to indentaion):
else:
if body.has_node(key_name):
$AnimationPlayer.play("close_and_lock")
open = false
else:
$AnimationPlayer.play("close")
open = false
Now we are ready to run (and pass) the test_lock_door() test.
If you get any failures, check the code at the end of this lesson and compare it to yours.

Tom Music Settings
Ovani Settings
Magic Sound Effects Settings
Wrapping Up
We’ve added another resource! Did you update your Readme to reflect that?
Add the following lines at the end of your Readme, then delete the two packs you didn’t use.
## Sound ##
### Sound Effects ###
[Medieval Fantasy Game Sound Effects](https://magicsoundeffects.itch.io/medieval-fantasy-game-sound-effects) by [Magic Sound Effects](https://magicsoundeffects.itch.io/)
[Medieval Fantasy Sound FX Pack Vol. 3](https://ovanisound.com/products/medieval-sound-fx-pack-vol-3) by [Ovani Sound](https://ovanisound.com/)
[Full Fantasy 250 SFX Pack](https://tommusic.itch.io/full-250-fantasy-sfx-pack) by [TomMusic](https://tommusic.itch.io/)
[Free Fantasy 200 SFX Pack](https://tommusic.itch.io/free-fantasy-200-sfx-pack) by [TomMusic](https://tommusic.itch.io/)
A Final Note
You may have noticed that we didn’t test what happens if you leave a locked door when it’s open and you don’t have a key. This could happen if your character decides to drop the key while the door is open. In this case, the door closes normally. See if you can write a test to cover this eventuality.
“Here are the files for this lesson if you want to download them to check your work!”
Level Up!
Congratulations! You’ve leveled up! Next up we are going to finally be creating an enemy this next level!
After that we’ll be implementing combat!
“Whew! That was a long one! Welcome to Level 7!”